Applying the Adapter Pattern for Analytics in Ember.js Apps
August 07, 2015 · 10 mins readAt DockYard, most (if not all) Ember apps we build for our clients require analytics in some form or other. For many of these apps, including the Google Analytics tracking script is sufficient. However, we’ve begun to notice an increased interest in other services such as Mixpanel or Kissmetrics for more data minded clients.
Including multiple services (typically we see about 3–5 different analytics in use) with different APIs leads to code duplication, which is less than ideal and generally a maintenance nightmare. I don’t know about you, but deleting repetitive code is one of my favorite things to do — so Michael and I set out to build an Ember addon that would apply the adapter pattern to analytics.
In this post, we’ll explore what the adapter pattern is, what it gives us, and demonstrate how to implement it to enable one API for orchestrating multiple analytics services.
Introducing the ember-metrics addon
To install the addon:
$ ember install ember-metricsThe ember-metrics addon adds a simple metrics service and customized LinkComponent to your app that makes it simple to send data to multiple analytics services without having to implement a new API each time.
Using this addon, you can easily use bundled adapters for various analytics services, and one API to track events, page views, and more. When you decide to add another analytics service to your stack, all you need to do is add it to your configuration, and that’s it.
With this addon, we wanted to make it super simple to write your own adapters for other analytics services too, so we set out to make it extensible and easily tested.
What is the Adapter Pattern?

I heard you like adapters
In a broad sense, the adapter pattern is about adapting between class and objects. Like its real world counterpart, the adapter is used as an interface, or bridge, between two objects.
In the case of analytics, this is an excellent pattern for us to implement, because these services all have different APIs, but very similar intent. For example, to send an event to Google Analytics, you would use the analytics.js library like so:
/**
 * Where:
 * button is the category
 * click is the action
 * nav buttons is the label
 * 4 is the value
*/
ga('send', 'event', 'button', 'click', 'nav buttons', 4);
While in Mixpanel, you would track the same event like this:
mixpanel.track('Clicked Nav Button', { value: 4 });And with Kissmetrics:
_kmq.push(['record', 'Clicked Nav Button', { value: 4 }]);As you can probably tell, this gets repetitive really quickly, and becomes hard to maintain when your boss or client wants to update something as simple as the event name across these services.
Applying the Adapter Pattern

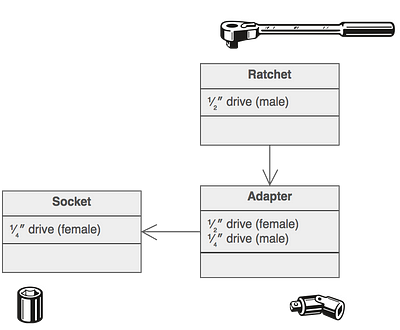
Diagram from https://sourcemaking.com/design_patterns/adapter
We generally have a few players in the adapter pattern: the client, the adapter (or wrapper), and the adaptee.
For ember-metrics, the client is our Ember.Service, the adapter is the adapter created for each analytics service, and the adaptee is the analytics library’s API.
Each analytics service has its own adapter that implements a standard contract to impedance match the analytics library’s API to the Ember.Service that is responsible for conducting all of the analytics in unison.
Using ember-metrics
The addon is first setup by configuring it in config/environment, then injected into any Object registered in the container that you wish to track.
module.exports = function(environment) {
  var ENV = {
    metricsAdapters: [
      { name: 'GoogleAnalytics', config: { id: 'UA-XXXX-Y' } },
      { name: 'Mixpanel', config: { token: 'xxx' } }
    ]
  }
}
Then, you can call a trackPage event across all your analytics services like so, using the metrics service:
import Ember from 'ember';

export default Ember.Route.extend({
  metrics: inject.service(),

  activate() {
    this._trackPage();
  },

  _trackPage() {
    run.scheduleOnce('afterRender', this, () => {
      const page = document.location.href;
      const title = this.routeName;

      get(this, 'metrics').trackPage({ page, title });
    });
  }
});
If you wish to only call a single service, just specify its name as the first argument:
// only invokes the `trackPage` method on the `GoogleAnalyticsAdapter`
metrics.trackPage('GoogleAnalytics', { title: 'My Awesome App' });
This is clearly a much cleaner implementation, as we can now use one API to invoke across all services we want to use in our app.
Implementing the Adapter Pattern in ember-metrics
The service metrics is the heart of the addon, and is responsible for orchestrating event tracking across all analytics that have been activated.
Setting up addon configuration
A simple pattern for passing configuration from the consuming app’s config/environment to the addon is through an initializer:
import config from '../config/environment';

export function initialize(_container, application) {
  const { metricsAdapters = {} } = config;

  application.register('config:metrics', metricsAdapters, { instantiate: false });
  application.inject('service:metrics', 'metricsAdapters', 'config:metrics');
}

export default {
  name: 'metrics',
  initialize
};
This lets us access the configuration POJO from within the metrics service by retrieving the metricsAdapter property when the service is created.
import Ember from 'ember';

export default Ember.Service.extend({
  _adapters: {},

  init() {
    const adapters = Ember.getWithDefault(this, 'metricsAdapters', Ember.A([]));
    this._super(...arguments);
    this.activateAdapters(adapters);
  },

  activateAdapters(adapterOptions = []) {
    const cachedAdapters = Ember.get(this, '_adapters');
    const activatedAdapters = {};

    adapterOptions.forEach((adapterOption) => {
      const { name } = adapterOption;
      let adapter;

      if (cachedAdapters[name]) {
        Ember.warn(`[ember-metrics] Metrics adapter ${name} has already been activated.`);
        adapter = cachedAdapters[name];
      } else {
        adapter = this._activateAdapter(adapterOption);
      }

      Ember.set(activatedAdapters, name, adapter);
    });

    return Ember.set(this, '_adapters', activatedAdapters);
  }
});
With the retrieved configuration, we then call the service’s activateAdapters method in order to retrieve the adapter(s) from the addon or locally, then caching them in the service so they can be looked up later easily.
Activating an adapter simply calls create on the looked up adapter (which inherits from Ember.Object) and passes along any analytics specific configuration such as API keys.
_activateAdapter(adapterOption = {}) {
  const metrics = this;
  const { name, config } = adapterOption;

  const Adapter = this._lookupAdapter(name);
  assert(`[ember-metrics] Could not find metrics adapter ${name}.`, Adapter);

  return Adapter.create({ metrics, config });
}
Because we’ve also implemented caching, we can safely call activateAdapters without having to re-instantiate already activated adapters, which allows us to defer the initialization of these analytics if (for example) we need to dynamically retrieve a property from one of our models:
import Ember from 'ember';

export default Ember.Route.extend({
  metrics: Ember.inject.service(),
  afterModel(model) {
    const metrics = Ember.get(this, 'metrics');
    const id = Ember.get(model, 'googleAnalyticsKey');

    metrics.activateAdapters([
      { name: 'GoogleAnalytics', config: { id } }
    ]);
  }
});
Leveraging the container and resolver
Then, leveraging the Ember container and conventions around the ember-resolver, we can lookup adapters from the addon first, and then fallback to locally created adapters.
_lookupAdapter(adapterName = '') {
  const container = Ember.get(this, 'container');

  if (isNone(container)) {
    return;
  }

  const dasherizedAdapterName = dasherize(adapterName);
  const availableAdapter = container.lookupFactory(`ember-metrics@metrics-adapter:${dasherizedAdapterName}`);
  const localAdapter = container.lookupFactory(`metrics-adapter:${dasherizedAdapterName}`);
  const adapter = availableAdapter ? availableAdapter : localAdapter;

  return adapter;
}
This is done through looking up the adapter factory with container.lookupFactory, and passing in the correct name that the resolver can understand. For example, we can look up adapters from the addon by using the following lookup pattern:
name-space?@folder-name:file-nameWhere name-space (and the following @ symbol) is optional, if looking up from within the app. One thing to note is that the ‘folder name’ is usually determined by the singular form. For example, you would lookup the metrics service from the container like so:
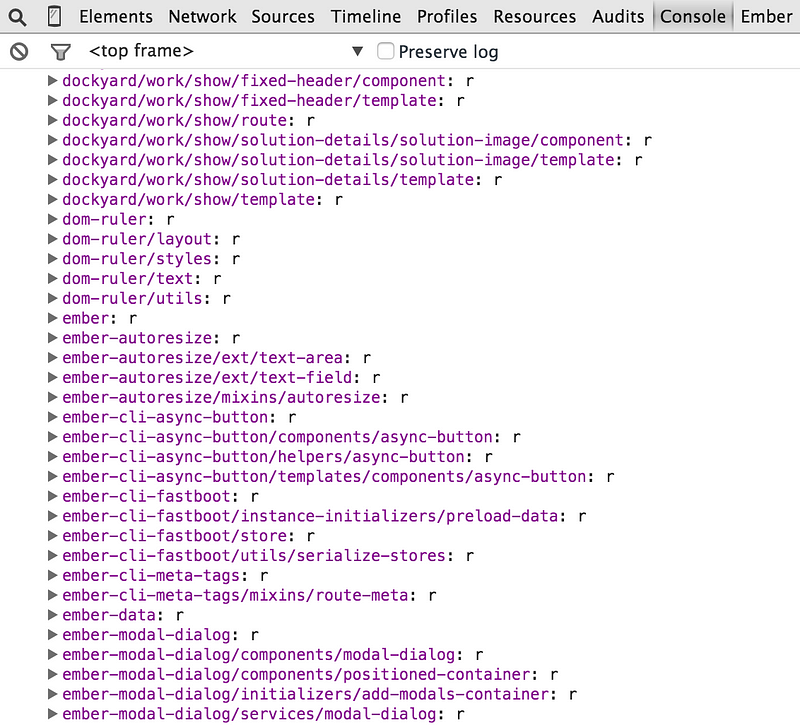
const metricsInstance = container.lookup('ember-metrics@service:metrics');If you’re wondering how the resolver maps this string to the actual files, you only need to type requirejs.entries into the developer console while in an Ember app. This returns all the entries that have been exported by requirejs. For example, here are some of the entries from the DockYard website:

To lookup the ember-wormhole component class from the application container, you would use:
container.lookupFactory('ember-wormhole@component:ember-wormhole');…which returns what you’d expect.

Invoking adapter methods from the service
Now that our service can access both local and addon adapters, we can invoke methods across activated adapters like so:
identify(...args) {
  this.invoke('identify', ...args);
},

alias(...args) {
  this.invoke('alias', ...args);
},

trackEvent(...args) {
  this.invoke('trackEvent', ...args);
},

trackPage(...args) {
  this.invoke('trackPage', ...args);
},

invoke(methodName, ...args) {
  const adaptersObj = Ember.get(this, '_adapters');
  const adapterNames = Object.keys(adaptersObj);

  const adapters = adapterNames.map((adapterName) => {
    return Ember.get(adaptersObj, adapterName);
  });

  if (args.length > 1) {
    let [ adapterName, options ] = args;
    const adapter = Ember.get(adaptersObj, adapterName);

    adapter[methodName](options);
  } else {
    adapters.forEach((adapter) => {
      adapter[methodName](...args);
    });
  }
}
Creating Adapters for the Addon
With the service implemented, we can now create a base adapter class that all adapters extend from:
/* jshint unused: false */
import Ember from 'ember';
import canUseDOM from '../utils/can-use-dom';

function makeToString(ret) {
  return function() { return ret; };
}

export default Ember.Object.extend({
  init() {
    Ember.assert(`[ember-metrics] ${this.toString()} must implement the init hook!`);
  },

  willDestroy() {
    Ember.assert(`[ember-metrics] ${this.toString()} must implement the willDestroy hook!`);
  },

  toString() {
    const hasToStringExtension = Ember.typeOf(this.toStringExtension) === 'function';
    const extension = hasToStringExtension ? ':' + this.toStringExtension() : '';
    const ret = `ember-metrics@metrics-adapter:${extension}:${Ember.guidFor(this)}`;

    this.toString = makeToString(ret);
    return ret;
  },

  metrics: null,
  config: null,
  identify: Ember.K,
  trackEvent: Ember.K,
  trackPage: Ember.K,
  alias: Ember.K
});
This is mainly so we can assert that the adapter’s init and willDestroy hooks are implemented, and to give it a nicer output in the console through overriding the toString function.
If you’re not already familiar with the Ember Object model, the init method is called whenever an Ember.Object is instantiated through Ember.Object.create().
We can thus rely on this knowledge that init will always be called on object instantiation to pass in configuration to the analytics, and to call its setup. Typically, an analytics service will create a script tag through JavaScript, and asynchronously load its library from some CDN.
Here’s the Google Analytics adapter that’s bundled with the addon:
import Ember from 'ember';
import canUseDOM from '../utils/can-use-dom';
import objectTransforms from '../utils/object-transforms';
import BaseAdapter from './base';

export default BaseAdapter.extend({
  toStringExtension() {
    return 'GoogleAnalytics';
  },

  init() {
    const config = Ember.get(this, 'config');
    const { id } = config;

    Ember.assert(`[ember-metrics] You must pass a valid \`id\` to the ${this.toString()} adapter`, id);

    if (canUseDOM) {
      /* jshint ignore:start */
      (function(i,s,o,g,r,a,m){i['GoogleAnalyticsObject']=r;i[r]=i[r]||function(){
        (i[r].q=i[r].q||[]).push(arguments)},i[r].l=1*new Date();a=s.createElement(o),
        m=s.getElementsByTagName(o)[0];a.async=1;a.src=g;m.parentNode.insertBefore(a,m)
      })(window,document,'script','//www.google-analytics.com/analytics.js','ga');
      window.ga('create', id, 'auto');
      /* jshint ignore:end */
    }
  },

  trackEvent(options = {}) {
    const compactedOptions = objectTransforms.compact(options);
    const sendEvent = { hitType: 'event' };
    let gaEvent = {};

    for (let key in compactedOptions) {
      const capitalizedKey = Ember.String.capitalize(key);
      gaEvent[`event${capitalizedKey}`] = compactedOptions[key];
    }

    const event = Ember.merge(sendEvent, gaEvent);
    window.ga('send', event);

    return event;
  },

  trackPage(options = {}) {
    const compactedOptions = objectTransforms.compact(options);
    const sendEvent = { hitType: 'pageview' };

    const event = Ember.merge(sendEvent, compactedOptions);
    window.ga('send', event);

    return event;
  },

  willDestroy() {
    Ember.$('script[src*="google-analytics"]').remove();
    delete window.ga;
  }
});
Enhancing the developer experience with blueprints
One of my favorite parts of ember-cli are its generators. Using blueprints, we can easily extend the cli commands to generate new metrics adapters using:
$ ember generate metrics-adapter foo-barThis creates app/metrics-adapters/foo-bar.js and a unit test at tests/unit/metrics-adapters/foo-bar-test.js. You can take a closer look at these blueprints here.
With these conventions in place, it’s now trivial for consuming app developers to add new adapters to work along side bundled adapters. And when they feel that an adapter they’ve built is ready to be shared with the community, they only need open a pull request to have that adapter included in the addon.
At some point in the future, it would make sense for each adapter to have its own repo and npm module, but to keep things simple, we’ve placed them within the addon.
Thanks for reading!
I hope you’ve learned something about addon creation and the adapter pattern. As always, please direct any comments or criticism to @potetotes.
Until next time,
Lauren
Written by Lauren Tan who lives and works in the Bay Area building useful things. You should follow her on Twitter