Ember.js — Detecting if a DOM Element is in the Viewport
November 21, 2014 · 6 mins read
Detecting whether or not an element is visible in the viewport is very useful when it comes to triggering animations or events. Before you drop in another jQuery plugin though, have a look at how easy it is to create a Mixin that you can add to any View or Component. Once added, you can simply ask that element if it’s in the viewport using the property the Mixin injects.
Let’s get started!
InViewportMixin
I’ll first show the entire mixin, and then walk through each logical section. The idea is essentially to make use of the getBoundingClientRect method on each element to get the details of the element’s position relative to the viewport. We then compare this to the window’s innerHeight and innerWidth to determine whether or not the element is in the viewport. To keep things reactive, we bind the scroll event to update the element’s new position in the viewport.
getBoundingClientRect — The amount of scrolling that has been done of the viewport area (or any other scrollable element) is taken into account when computing the bounding rectangle.
Full Gist
import Ember from 'ember';

export default Ember.Mixin.create({
  scrollTimeout:      100,
  boundingClientRect: 0,
  windowHeight:       0,
  windowWidth:        0,

  enteredViewport: Ember.computed('boundingClientRect', 'windowHeight', 'windowWidth', function() {
    var rect, windowHeight, windowWidth;
    rect =         this.get('boundingClientRect');
    windowHeight = this.get('windowHeight');
    windowWidth =  this.get('windowWidth');
    return (
      rect.top >= 0 &&
      rect.left >= 0 &&
      rect.bottom <= windowHeight &&
      rect.right <= windowWidth
    );
  }),

  exitedViewport: Ember.computed.not('enteredViewport'),

  _updateBoundingClientRect: function() {
    var el;
    el = this.$()[0];
    this.set('boundingClientRect', el.getBoundingClientRect());
  },

  _setup: (function() {
    return Ember.run.scheduleOnce('afterRender', this, function() {
      this._updateBoundingClientRect();
      this.set('windowHeight', window.innerHeight || document.documentElement.clientHeight);
      this.set('windowWidth', window.innerWidth || document.documentElement.clientWidth);
    });
  }).on('didInsertElement'),

  _scrollHandler: function() {
    return Ember.run.debounce(this, '_updateBoundingClientRect', this.get('scrollTimeout'));
  },

  _bindScroll: (function() {
    var scrollHandler;
    scrollHandler = this._scrollHandler.bind(this);
    Ember.$(document).on('touchmove.scrollable', scrollHandler);
    Ember.$(window).on('scroll.scrollable', scrollHandler);
  }).on('didInsertElement'),

  _unbindScroll: (function() {
    Ember.$(window).off('.scrollable');
    Ember.$(document).off('.scrollable');
  }).on('willDestroyElement')
});
Getting the Details we Need
scrollTimeout:      100,
boundingClientRect: 0,
windowHeight:       0,
windowWidth:        0,

_updateBoundingClientRect: function() {
  var el;
  el = this.$()[0];
  this.set('boundingClientRect', el.getBoundingClientRect());
},

_setup: (function() {
  return Ember.run.scheduleOnce('afterRender', this, function() {
    this._updateBoundingClientRect();
    this.set('windowHeight', window.innerHeight || document.documentElement.clientHeight);
    this.set('windowWidth', window.innerWidth || document.documentElement.clientWidth);
  });
}).on('didInsertElement'),
First, let’s setup the basic building properties we need in our view: scrollTimeout, boundingClientRect, windowHeight and windowWidth. Because it’s computationally expensive to listen to every single scroll event, we’ll set a sensible timeout to debounce the scroll handler. This basically means the handler will only be called every 100ms in our case.
Next, we need to setup the initial values (L#12) of the properties when the element is inserted into the page. Ember’s View#didInsertElement is called when the view has been inserted into the DOM, so we can hook into it to get the right details at the right time. To ensure that this fires only after the element has been rendered, we use Ember.run#scheduleOnce to schedule the update once in the afterRender queue. If you’re unfamiliar with how the Ember run loop works, I highly recommend reading EmberZone’s 50,000 foot overview.
When the element is rendered on the screen, we simply use jQuery (one of Ember’s dependencies) to get the DOM element of the view, then set the value of the boundingClientRect property to the element’s getBoundingClientRect() object.
Handling Scroll Events and Listeners
In order to update boundingClientRect every time the window is scrolled, we’ll need to setup some event listeners:
_scrollHandler: function() {
  return Ember.run.debounce(this, '_updateBoundingClientRect', this.get('scrollTimeout'));
},

_bindScroll: (function() {
  var scrollHandler;
  scrollHandler = this._scrollHandler.bind(this);
  Ember.$(document).on('touchmove.scrollable', scrollHandler);
  Ember.$(window).on('scroll.scrollable', scrollHandler);
}).on('didInsertElement'),

_unbindScroll: (function() {
  Ember.$(window).off('.scrollable');
  Ember.$(document).off('.scrollable');
}).on('willDestroyElement')
The _scrollHandler method debounces function calls to _updateBoundingClientRect (defined earlier) based on the scrollTimeout we set initially. This is because running the method on every single scroll event is expensive, and we don’t really need to be that responsive.
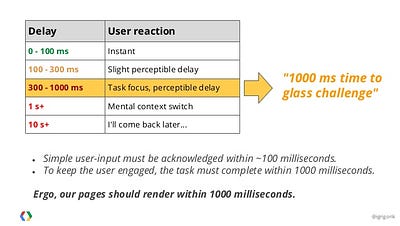
We’ll want to keep the timeout between 100 — 300ms, so users perceive it as nearly instantaneous.
_bindScroll and _unbindScroll creates and destroys our scroll listener when the element is inserted, and when it is destroyed. Unbinding listeners is good practice, otherwise you’ll cause memory leaks in your app.
Exposing the Public API to Views and Components
Now that we’ve created the logic for our mixin, it’s time to let our API be consumed by the Views or Components we want to track.
enteredViewport: Ember.computed('boundingClientRect', 'windowHeight', 'windowWidth', function() {
  var rect, windowHeight, windowWidth;
  rect =         this.get('boundingClientRect');
  windowHeight = this.get('windowHeight');
  windowWidth =  this.get('windowWidth');
  return (
    rect.top >= 0 &&
    rect.left >= 0 &&
    rect.bottom <= windowHeight &&
    rect.right <= windowWidth
  );
}),

exitedViewport: Ember.computed.not('enteredViewport'),
The idea is essentially to make use of the getBoundingClientRect method on each element to get the details of the element’s position relative to the viewport.
enteredViewport is a computed property that determines whether or not the element is inside the viewport. We observe the three properties we set initially, so that the computed property updates when their values change. If you have a read of the API for getBoundingClientRect(), you’ll realize that an element is in the viewport when it’s bottom and right values are within the window’s innerHeight/width. This returns a boolean value, that we can then use in our Views or Components.
exitedViewport is a computed property macro that simply inverses another property after coercing it into a boolean value.
With these APIs, we can now do some interesting things when an element enters or leaves the viewport!
Consuming the Mixin
With Ember, reusable mixins are easy to use. Here’s the example I made in my JS Bin:
App.ThisIsDogComponent = Ember.Component.extend(App.InViewportMixin, {
  classNames:        ['dog-card'],
  classNameBindings: ['enteredViewport:entered-viewport']
});
With the mixin added, you can use enteredViewport and exitedViewport like any other property in your View or Component.
The component I made in my JS Bin renders a card with a dog breed and some filler description, and its style updates when the cards enter the viewport. It’s a simple example, but it should give you an idea of what you can do with this. You could have animations fire, or you could perform certain logic when something enters the viewport.
I hope you’ve enjoyed reading! If you have any questions, you can tweet me or leave a note on this post.

Written by Lauren Tan who lives and works in the Bay Area building useful things. You should follow her on Twitter