Adding Flash Messages to an Ember App
November 30, 2014 · 6 mins read
One of Jakob Nielsen’s 10 heuristics for user interface design is Visibility of System Status, or in other words, keeping users informed about the status of the system through appropriate and timely feedback. A mechanic for fulfilling this heuristic is the use of flash messages, which are concise notifications that appear briefly in the user interface before being dismissed automatically (or manually).
In this post, we’ll learn about creating a service that can be injected into Ember Controllers and Routes, that lets us easily add a flash message to our app. We can then trigger these messages in specific actions with a simple API. Let’s get to it!
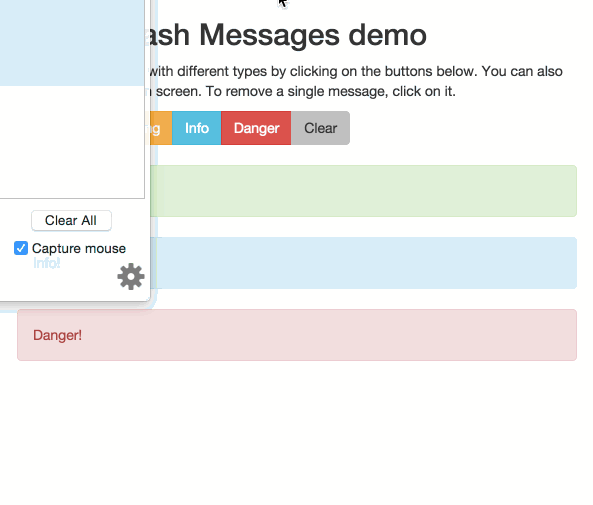
The flash message addon in action
Planning our Approach
On a high level, we’ll be creating a singleton FlashMessageService that injects itself into all Ember Controllers and Routes. The service will contain a queue of messages that dequeue automatically after a certain amount of time has elapsed.
These messages can then be created from any Ember Controller or Route, then rendered in the application template.
Update (1st Feb 2015)
I’ve also made this an ember-addon — you can install it with:
$ ember install:addon ember-cli-flashor:
$ npm install --save ember-cli-flashThe Flash Message Service
The Flash Message Service is an Ember.Object that holds a queue of Flash Messages. The public API will allow us to create success, info, warning and danger type messages, as well as add flash messages with custom type, and clear all visible flash messages.
Usage is very simple. From within a Controller or Route:
actions: {
  successAction() {
    Ember.get(this, 'flashes').success('Success!', 2000);
  },

  warningAction() {
    Ember.get(this, 'flashes').warning('This is a warning message'); // timeout is optional
  },

  infoAction() {
    Ember.get(this, 'flashes').info('You just did something...', 500);
  },

  dangerAction() {
    Ember.get(this, 'flashes').danger('So danger');
  },

  customAction() {
    Ember.get(this, 'flashes').addMessage('This is a flash with a custom type', 'myCustomType', 3000)
  },

  clearMessages() {
    Ember.get(this, 'flashes').clear(); // clears all visible flash messages
  }
}
Props
queue          : Ember.A([]),
isEmpty        : computed.equal('queue.length', 0),
defaultTimeout : 2000,
The Flash Service starts out with an empty array as its queue property. Flash messages that are created are pushed into this queue, and removed when their timeouts have elapsed. We also setup a global defaultTimeout, in case one isn’t specified when creating new flash messages.
Public methods
  success(message, timeout=get(this, 'defaultTimeout')) {
    this._addToQueue(message, 'success', timeout);
  },

  info(message, timeout=get(this, 'defaultTimeout')) {
    this._addToQueue(message, 'info', timeout);
  },

  warning(message, timeout=get(this, 'defaultTimeout')) {
    this._addToQueue(message, 'warning', timeout);
  },

  danger(message, timeout=get(this, 'defaultTimeout')) {
    this._addToQueue(message, 'danger', timeout);
  },
The success, info, warning, and danger methods simply curry the _addToQueue method with their types filled in as you’d expect. Also note the use of es6 syntax here — we can pass in default values for timeout. Awesome!
  addMessage(message, type='info', timeout=get(this, 'defaultTimeout')) {
    this._addToQueue(message, type, timeout);
  },

  clearMessages() {
    let flashes = get(this, 'queue');

    flashes.clear();
  },
addMessage is responsible for creating flash messages where the user wishes to have a type that isn’t one of the default four, and clearMessages clears the array.
_newFlashMessage
  _newFlashMessage(service, message, type='info', timeout=get(this, 'defaultTimeout')) {
    Ember.assert('Must pass a valid flash service', service);
    Ember.assert('Must pass a valid flash message', message);

    return FlashMessage.create({
      type         : type,
      message      : message,
      timeout      : timeout,
      flashService : service
    });
  }
This private method is responsible for creating new flash message objects. A timeout is also set here, so we can remove the created flash message after a certain amount of time has elapsed.
The created flash message object also holds a reference to the singleton flash service, so that it can remove itself from the queue after the timeout has elapsed.
_addToQueue
  _addToQueue(message, type, timeout) {
    let flashes = get(this, 'queue');
    let flash   = this._newFlashMessage(this, message, type, timeout);

    flashes.pushObject(flash);
  },
This private method creates a new flash message object, then pushes it into the queue.
The Flash Message Object
This Ember Object represents a single flash message.
Props
  isSuccess      : computed.equal('type', 'success'),
  isInfo         : computed.equal('type', 'info'),
  isWarning      : computed.equal('type', 'warning'),
  isDanger       : computed.equal('type', 'danger'),

  defaultTimeout : computed.alias('flashService.defaultTimeout'),
  queue          : computed.alias('flashService.queue'),
These are convenience properties using Ember.computed macros.
On init
  destroyLater: function() {
    let defaultTimeout = get(this, 'defaultTimeout');
    let timeout        = getWithDefault(this, 'timeout', defaultTimeout);

    run.later(this, '_destroyMessage', timeout);
  }.on('init'),
When the Object’s create method is called, init runs and calls _destroyMessage on it after the timeout period has passed.
Destroying the message
  destroyMessage() {
    this._destroyMessage();
  },

  // private
  _destroyMessage() {
    set(this, 'isDestroyed', true);
    get(this, 'queue').removeObject(this);
  }
Calling _destroyMessage sets the isDestroyed flag on the message, and removes itself from the queue. We also expose destroyMessage so that the flash message can be destroyed from the component itself.
Injecting the Flash Messages Service into Ember Controllers
Now that we have a service that holds a queue of flash messages, we’ll need to inject it into all our Controllers and Routes, so we can easily add new flash messages from across the app. We register the factory as a singleton, as we only want one instance of the service.
For more information about dependency and service lookups, check out the Ember guides.
import FlashMessagesService from 'ember-cli-flash/services/flash-messages-service';

export function initialize(_container, application) {
  application.register('service:flash-messages', FlashMessagesService, { singleton: true });
  application.inject('controller', 'flashes', 'service:flash-messages');
  application.inject('route', 'flashes', 'service:flash-messages');
}

export default {
  name: 'flash-messages-service',
  initialize: initialize
};
Rendering Flash Messages with a Component
With the service created, we can render all our flash messages into our application template. We’ll wrap it in a very simple component, which adds classes needed for Bootstrap to style ‘alerts’.
import Ember from 'ember';

const { computed, get } = Ember;

export default Ember.Component.extend({
  classNames:        [ 'alert', 'flashMessage' ],
  classNameBindings: [ 'alertType' ],

  alertType: computed('flash.type', function() {
    let flashType = get(this, 'flash.type');

    return `alert-${flashType}`;
  }),

  flashType: computed('flash.type', function() {
    let flashType = get(this, 'flash.type');

    return flashType.classify();
  }),

  click() {
    let flash = get(this, 'flash');

    flash.destroyMessage();
  }
});
Now we can render our flash messages easily into any template:
You can also pass in your own template for the flash message if you wish:
<h6></h6>
<p></p>
Implementing this yourself is quite simple, but if you’d rather not, please install the ember-addon!
$ ember install:addon ember-cli-flashor:
$ npm install --save ember-cli-flash
Written by Lauren Tan who lives and works in the Bay Area building useful things. You should follow her on Twitter